This article is an excerpt from Rodale Institute’s “A Simple Guide to Vermicomposting.” Click here to download the full guide.
Solid waste generation in the United States continues to rise at a steady rate. According to the US Environmental Protection Agency, Americans generated about 254 million tons of trash in 2013, which is the equivalent of 4.40 pounds per person per day.
Yard debris and food waste combined account for nearly 30% of the materials disposed in US landfills. These materials can be easily composted in municipal and backyard composting systems and fortunately, composting collection programs have been increasing with increasing waste generation. However, backyard composting may not be an option for many individuals that wish to divert their materials from the landfill because they lack yard space, time or energy or else live in a rental unit; therefore, vermicomposting becomes an attractive alternative. What’s more, vermicomposting can be a powerful educational tool for teaching children about decomposition, microbiology, earthworms and the importance of managing organic residuals such as food waste at home.
Why vermicompost?
Vermicompost is the product of earthworm digestion and aerobic decomposition using the activities of micro- and macroorganisms at room temperature. Vermicomposting, or worm composting, produces a rich organic soil amendment containing a diversity of plant nutrients and beneficial microorganisms.
There are several benefits for vermicomposting but the two most popular are (1) diverting organic residuals from the landfill and reducing trash collection fees and (2) creating resources from waste materials.
Vermicomposting can be a fun activity for school children, and vermicompost can be utilized in gardens to promote plant growth. Vermicompost can be mixed with potting media at a rate of 10% by volume or else added directly into your soil; both options will provide plants with valuable organic matter, nutrients, and a diversity of beneficial microbes.
Earthworm biology
Typical earthworms that you find in your garden are not suitable for vermicomposting. These are soil-dwelling worms that do not process large amounts of food waste and don’t reproduce well in confined spaces. Instead, worms commonly known as redworms or red wigglers are preferred because they reproduce rapidly, are communal and tend to remain on the surface while feeding.
There are several species of vermicomposting worms but the most common are Eisenia fetida and E. andrei. Red wigglers are hermaphrodites having both male and female reproductive parts; however, it still requires two worms to mate with each worm donating sperm to the other worm.
Under ideal conditions, a worm bin population can double about every 2 months (4-6 weeks from cocoon to emergence and 6-8 weeks from emergence to maturity). The “band” around a worm, known as the clitellum, indicates maturity and is reproductively active. Cocoons are about the size of a match stick head, turning pearly white to brown as they develop until one to several baby worms hatch.
Red wigglers require similar conditions as humans for growth – they prefer room temperature (55-85°F) and adequate moisture. The population of a worm bin is controlled through nutrient/food availability and space requirements.
Building a worm bin
There are a number of bins that can be used to raise earthworms, some of the more common are plastic bins of various sizes. Worm bins can be made of wood but cedar should never be used as it contains antimicrobial properties. Commercial bins can also be purchased online. Bins made from 1-2 inch thick Styrofoam have proven to be a suitable alternative to plastic bins with the added advantage of better insulation and can be acquired for free from fish/pet supply stores. Smaller bins are fitting for those just starting out but will restrict population growth while larger bins, usually 18 inches wide, 24 inches long and 18 inches deeps are typical for larger worm populations.
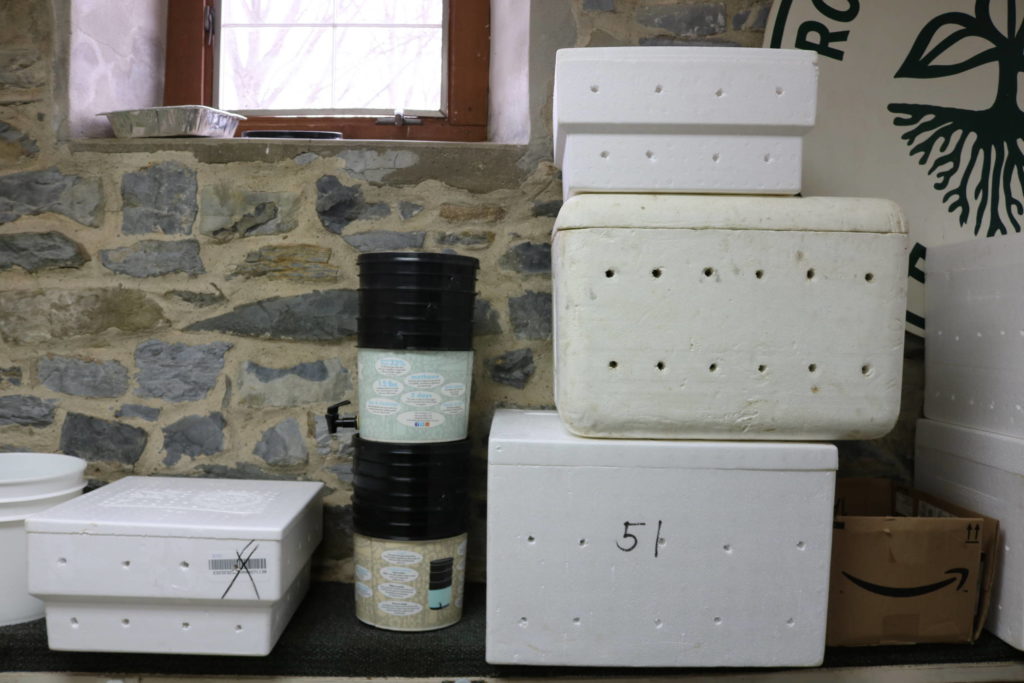
Bins should be well ventilated, containing numerous holes on the bottom and at least two rows of holes along the bottom half and middle of the bin. Larger holes can be cut in the lid of the bin but should have a piece of cloth taped over top to discourage fruit flies. Worm bins should be raised off the ground with long stakes so that air may flow under the bin.
Fill about half of the bin with moist, shredded newspaper to use as bedding and then add a handful of garden soil, which will inoculate the bin with microorganisms and sand that the worms use in their gizzard to grind food.
Now add the worms! Worms can be purchased online. Beginners can easily get away with 1,000 worms for new bins but need to remember that smaller populations will take more time to digest food waste. Place the bin in a cool dark location with minimal temperature fluctuations, will not freeze or become excessively hot during the summer. Basements are typical locations but under a kitchen sink is also suitable.
Managing a worm bin
Worms benefit from the fewest disturbances as possible – kind of like beneficial neglect. For instance, worms dislike light, and each time the lid opens the worms will stop feeding and seek shelter below the surface. With that said, they still require food and water. Moisture is often supplied with food waste. More moisture can be added if needed using a spray bottle.

Feed worms leftover fruits and vegetables and other kitchen prep waste. Place the food under the shredded newspaper. One tip to prevent overfeeding is to feed smaller amounts every 1-2 weeks, with each amount placed in a different location in a circle around the bin. This will allow you to see how well the worms are digesting the food from the previous feeding.
Be sure to observe what food materials are preferred so that you can customize the feed. Do not feed worms meat, dairy, fatty, oily, or fermented products as these will attract pests, harmful bacteria, foul odors and cause worms to leave the bin. In general, worms will consume a wide variety of food materials but be sure not to provide too much of one material at any one feeding.
Moist, shredded newspaper will need to be replaced throughout the life of the worm bin so that the food waste is always covered. This will prevent fly nuisances and reduce issues with odors.
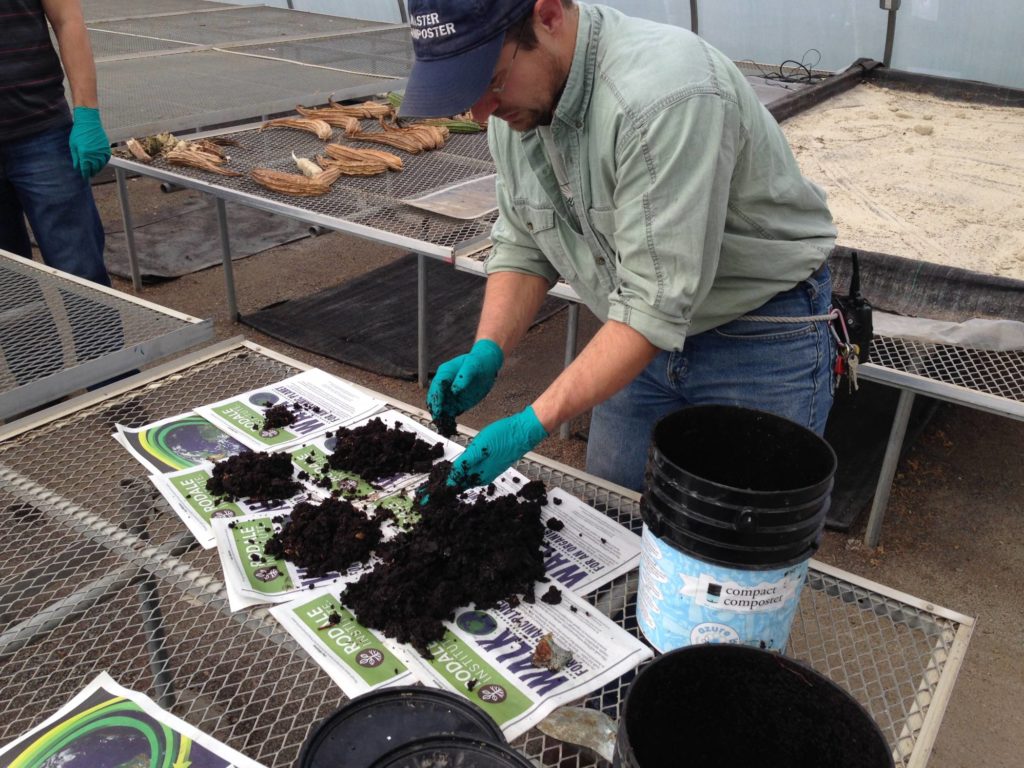
As the worms consume food waste they excrete dark, almost black casts, or worm poop, which is the product of vermicomposting. Castings are dense in nutrients and microorganisms and are highly regarded for plant production. At some point the bin will become overwhelmingly full of castings and will need to be harvested.
Harvesting your compost
A simple method for harvesting castings and separating worms from castings is to use the “dump and sort” method. Dump the contents of the bin on a tarp under a lit environment, separate undigested material from finished material and place the finished material in several small cone-like shapes. Overtime the worms will flee from the light and migrate to the center of the cone. Slowly scrape away worm-free castings from the top and sides of the cones until worms are visible again. Eventually, the worms will have migrated to the bottom middle of the cone and you are left with a small pile of worms. Put the worms back in the bin and begin feeding again.
Troubleshooting
It’s not uncommon for experienced vermicomposters to lose a colony of worms from time to time. A number of causes can lead to worm losses, foul odors, and pest and fly nuisances; but anticipating issues and quickly troubleshooting back to a balanced worm bin will ensure success.
Bins that are too wet may generate foul odors as food materials are being decomposed anaerobically or else encourage fruit fly outbreaks. Bins that are too dry will reduce worm feeding and growth. Shredded newspaper, moist or dry, can be used to control the moisture content of a worm bin. Choosing food waste that is either wet or dry can also help control moisture. Food that is left uncovered is sure to promote fruit flies, which will be a nuisance at home but can be easily controlled using fruit fly traps – a small container with a tablespoon of apple cider vinegar and a reversed conical lid with a small hole cut at the bottom of the cone. Lastly, avoid overfeeding and especially food materials that should not be put into a worm bin (see above).
Rick Carr is the Compost Production Specialist at Rodale Institute.