A guest post by John and Aimee Good, owners of The Good Farm in Germansville, PA.
Many beginning farmers overlook the fact that weed management is the most labor intensive aspect of growing organic vegetables. Not using the right weed management tools at the right time can lead to a long season of trying to save crops buried knee deep in the weeds. If your approach to weed management is reactive rather than proactive, you do not stand a chance. Before planting a single seed, it is vital to have a plan for efficiently and effectively managing the weeds. This will ultimately determine the crops’ chance for success.
For most vegetable farms larger than one or two acres, the key to weed control is developing a mechanical cultivation system to suit the needs of every crop. The first step in creating a cultivation system is determining the width of the beds. Bed width is determined by the size of the tractor straddle, measured from the center of one tire to the other. Tractor tire centers are generally set at four, five, or six feet for most vegetable production systems. All tractors on the farm should be set to the same tire centers so you can drive over any bed without damaging the crop.
The width of the tractor straddle will determine the width of the bed top. The tire tracks become the pathways between the beds. Larger tractor straddles equal larger bed tops and vice versa. The size of the bed top determines how many rows can fit in a bed. For ease of cultivation, it is best to set rows no closer than twelve inches apart on center. You also need to leave at least six inches on the outside of the outer rows for the tractor tires to clear the crop. We call this space the “shoulder” of the bed.
All seeders and transplanters need to “fit” the row and bed spacings. This is usually achievable with most commercially available tractor mounted seeders and transplanters. It is possible to mechanically cultivate beds planted by hand; we use a walk behind seeder and used to do all of our transplanting by hand as well. The key is to make a tool to mark your rows that you can pull behind your tractor. We have three narrow field cultivator tips bolted to the back of our tiller to mark our rows so we can till our beds and mark rows in one pass. We also can mount these row markers on the back of our cultivator toolbar.
The row markers on the back of our tiller create three small furrows on fifteen inch centers perfectly spaced on our bed. We then can push our seeder right down these marked rows or transplant into them. Even when using our water wheel tranplanter, which has three planting wheels on fifteen-inch centers, we find it helpful to use the marked rows to align the transplanter wheels within the bed. Marking all of our rows mechanically allows us to come back later and cultivate mechanically without harming the crop. We know that all of our rows are exactly fifteen inches apart, and if we happen to swerve a little while laying out the rows with the tractor, we know that all three rows will swerve together and we will not run the risk of damaging them with the cultivator.
Only after you have settled on a bed size and row spacing can you begin to consider what tools to use for cultivating. Cultivators come in a myriad of types, shapes, and sizes. Different tools are better suited for different soil conditions and crops. In heavier soils, you may need to rely more on sweeps and shovels. In lighter soils, you can do really well with tine and basket weeders. The key is to do your research and find the tools that will be best for your system, and make sure the size and configuration of the tools will fit your bed size and row spacing.
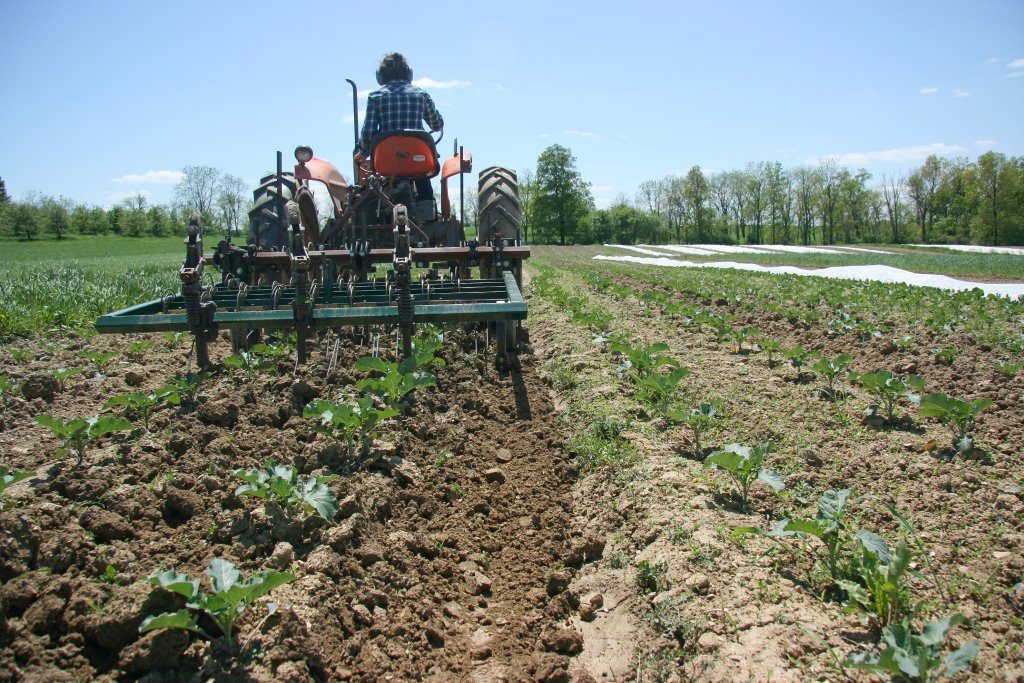
On our farm, we have our tractors set on five foot centers. This leaves us with a four foot bed top for planting. On our four foot bed, we have up to three rows on fifteen inch centers. It is helpful to remember that each row will be approximately four inches wide when planted; so rows on fifteen inch centers have about ten inches of empty space between them. Our cultivator shovels are then eight inches wide, leaving us a one inch margin of error between the rows.
We really like using a three row system on our beds. We plant three rows per bed of small crops like lettuce, carrots and onions. We plant only two rows per bed, on thirty inch centers, of larger crops like broccoli and peppers. Finally, we plant only one row down the center of the bed for large crops like tomatoes and squash. The nice part of the three row system is that it is easy to adapt our cultivators to one, two, or three rows. It is often tempting to squeeze as many rows into a bed top as possible. We generally advise against this. Mechanical cultivation takes time and practice to get good at, and the more rows you are dealing with, the more complicated and difficult the task becomes.
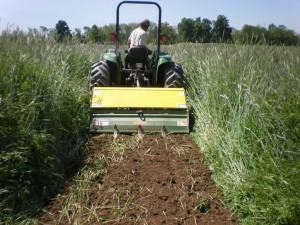
Our primary cultivating tractor is a Kubota L245h. This is one of a few different models built in the early eighties specifically for cultivation. The tractor has an offset engine that allows the driver to clearly see under the tractor’s belly. It has a set of hydraulic toolbars mounted on the belly. We can attach cultivator shovels on these toolbars to pass between the crop rows. Since we can clearly see these shovels, we are able to cultivate within one inch of the rows without damaging the crops. We can’t do much better than that with a hoe. The nice part of having a three row system is that we never have to move these belly-mounted cultivators. Whether we are cultivating one, two, or three rows, we know the crops will “swim” through the space between these shovels without being damaged.
On the back of the tractor, we carry a William’s Weeder toolbar. This cultivator consists of two toolbars followed by a tine weeder. We can mount an array of cultivators to the two front toolbars. We generally use sweeps and side knives, but occasionally mount hilling discs as well. We use these tools to cultivate spaces not as close to our rows and to cultivate the tire tracks behind the tractor. We can easily raise or lower these knives on the toolbar depending on whether it is a one, two, or three row crop. These knives are then followed by the tine weeder, which is also adjustable according to the number of rows, and can even be dragged right through the crop to eliminate in-row weeds. While the William’s Weeder has some disadvantages, namely that it is very long and somewhat ungainly, we love its flexibility.
We are continually adjusting our cultivators and trying new tools. As our weed species change over time, we have had to change our tools to effectively manage them. As our skills with cultivating have increased, we have used our tools more aggressively and changed them to get ever closer to the edges of our rows. Our experience with the tine weeder has shown us that we can run it blind right through the rows of most crops and eliminate a great deal of the weeds within the row. We see fewer weeds on the farm and spend less time hand weeding every year. The constant over time has been the system. We have always planted three rows on four foot beds and marked these rows mechanically. This has allowed us to use an array of different cultivators and tools to effectively manage the weeds.
We always encourage other farmers to consider how to weed a crop before it is ever planted. The importance of good weed management planning and systems cannot be overstated. Taking the time to thoroughly develop these systems before planting will save hours of back breaking hoeing and hand weeding later. Even with a mechanical cultivation system in place, you can still count on doing your fair share of hand weeding. Investing time and resources in the development of a whole farm cultivation system will pay off in labor savings and crop productivity.
The first tool we bought when we started our farm was the Kubota cultivating tractor. We then built a simple toolbar to carry different cultivators behind it. In the first few years, we had to press the little Kubota to do an array of tasks it was ill-suited to handle, and we had to custom hire most of our tillage work. That being said, we never regretted investing in cultivation first and foremost. We have slowly added other tools and another tractor as we were able. But we always knew that weeding would be our biggest task and having weed-free crops was the first step in building a successful farm.
Trying to start your own organic farm? Rodale Institute offers consulting services nationwide, free for farmers in Pennsylvania.